Achieving a professional chocolate finish isn’t about the recipe—it’s about controlling the physics of cocoa butter crystallization.
- Success depends on forming stable “Form V” crystals, which requires precise temperature control and an understanding of heat transfer.
- The quality of your tools and ingredients (couverture chocolate, polycarbonate molds) is non-negotiable and directly impacts the final shine and snap.
- Mastery involves moving beyond just reading a thermometer to observing visual cues and managing your entire kitchen environment.
Recommendation: Adopt a scientific mindset. Treat your kitchen as a laboratory and your ingredients with absolute precision to achieve consistently flawless results.
The frustration is palpable: you follow the recipe, you watch the thermometer like a hawk, and yet your homemade chocolates emerge dull, streaky, or stubbornly soft. Many home bakers believe tempering chocolate is a dark art, a matter of luck or expensive equipment. They focus on hitting specific temperatures, a method that often leads to inconsistent results and deepens the mystery rather than solving it. The truth is, the secret to that coveted glossy finish and satisfying snap has little to do with artistry and everything to do with chemistry.
Mastering tempering isn’t about following a culinary recipe; it’s about conducting a scientific experiment. The goal is to control the polymorphic crystallization of cocoa butter at a microscopic level. This requires moving beyond a simple temperature chart to understand the physics of heat transfer, the importance of crystal nucleation, and the critical role of environmental factors like humidity and ambient temperature. These are the variables that separate amateur attempts from professional perfection.
This guide will not just give you steps to follow. It will equip you with the fundamental principles of pastry science. We will explore how concepts from seemingly unrelated areas—the properties of different fats, the science of emulsions, the thermal dynamics of your equipment, and even the discipline of sourcing ingredients—all converge on this single, crucial process. By treating your home kitchen as a lab, you will learn to control the process, diagnose failures, and finally achieve that flawless, professional-grade chocolate finish, every single time.
To achieve this, we will deconstruct the process into its core scientific principles. This article provides a structured path, moving from foundational concepts to advanced techniques, to build your expertise systematically.
Summary: How to Master Tempering Chocolate in a Home Kitchen?
- Why Butter Temperature Is the Difference Between Flaky and Greasy?
- How to Save a Broken Ganache With One Simple Ingredient?
- Silicone vs Metal Molds: Which Gives the Best Shine to Pastries?
- The Substitution Error: Why You Can’t Swap Margarine for Butter in Pastry?
- Sequence & Plan: Why You Must Chill Dough for 24 Hours Before Baking
- Stoneware vs Porcelain: Which Is Best for Daily Dinnerware Use?
- The Kelvin Temperature Mistake That Makes New Kitchens Look Sterile
- Sequence & Plan: Visiting Local Markets at 6 AM for the Best Produce
Why Butter Temperature Is the Difference Between Flaky and Greasy?
Before we can control chocolate, we must first understand the behavior of fat crystals. Butter in pastry serves as a perfect analogy. When cold, the solid fat crystals in butter create separate layers in dough, which turn into flaky pockets of steam during baking. If the butter is too warm, the crystals melt, the fat blends into the flour, and the result is a greasy, dense texture. This is a lesson in fat polymorphism—the ability of a fat to exist in multiple crystalline forms.
Cocoa butter is far more complex than butter, possessing six distinct crystal forms. Only one, the stable Form V crystal, delivers the shine, snap, and smooth melt-in-your-mouth texture of perfectly tempered chocolate. The entire tempering process is a carefully controlled heating and cooling sequence designed to eliminate the five unstable crystal forms and encourage the exclusive growth of Form V.
At a molecular level, this means coaxing cocoa butter into its most stable structure. Food science research shows that the ideal Form V crystals melt at 34°C (93°F), which is just above human body temperature. This is why well-tempered chocolate is solid at room temperature but melts luxuriously on the tongue. All other crystal forms are unstable, melt at lower temperatures, and rearrange over time into the chalky, gray streaks known as fat bloom. Understanding this principle is the first step from simply cooking to true mastery.
How to Save a Broken Ganache With One Simple Ingredient?
Understanding failure is as important as understanding success. A broken ganache, where the fat separates from the liquid into a greasy mess, is an emulsion failure. While chemically different from a tempering failure, the diagnostic mindset is the same. In both cases, you are dealing with fat that is not behaving as intended due to temperature or agitation issues. A broken ganache can often be saved by re-establishing the emulsion with a small amount of warm liquid. Similarly, diagnosing a tempering failure requires identifying the visual symptom and understanding its molecular cause.
Chocolate failures primarily manifest as two types of “bloom.” Fat bloom is the most common, appearing as white or gray streaks. This is the physical result of unstable cocoa butter crystals (Forms I-IV) migrating to the surface and recrystallizing. Sugar bloom, on the other hand, is a gritty, dull surface caused by moisture. Condensation on the chocolate dissolves sugar, and when the water evaporates, the sugar recrystallizes on the surface in a rough, sandy texture.
This chart breaks down the common visual cues of a tempering failure, its scientific cause, and the professional strategy to prevent it.
Understanding these failure modes is key to troubleshooting your work, as this diagnostic guide, based on an analysis from professional chocolatiers, demonstrates.
| Visual Symptom | Technical Cause | Failure Type | Prevention Strategy |
|---|---|---|---|
| White/gray streaks or spots | Unstable crystal forms (I-IV or VI) | Fat Bloom | Proper tempering to Form V; avoid temperature shock |
| Dusty white surface, tackiness | Moisture condensation dissolving sugar | Sugar Bloom | Prevent condensation; gradual temperature changes only |
| Thick, lumpy texture | Over-crystallization during cooling | Excessive Form V nuclei | Control cooling rate; maintain working temperature |
| Soft, dull appearance | Temperature too high or incomplete tempering | Insufficient Form V | Verify working temperature 31-32°C for dark chocolate |
The visual difference is stark. On the left, properly formed Form V crystals create a dense, uniform surface that reflects light like a mirror. On the right, the chaotic structure of bloomed chocolate scatters light, resulting in a dull, unappealing finish. Preventing these outcomes is the entire purpose of precise tempering.
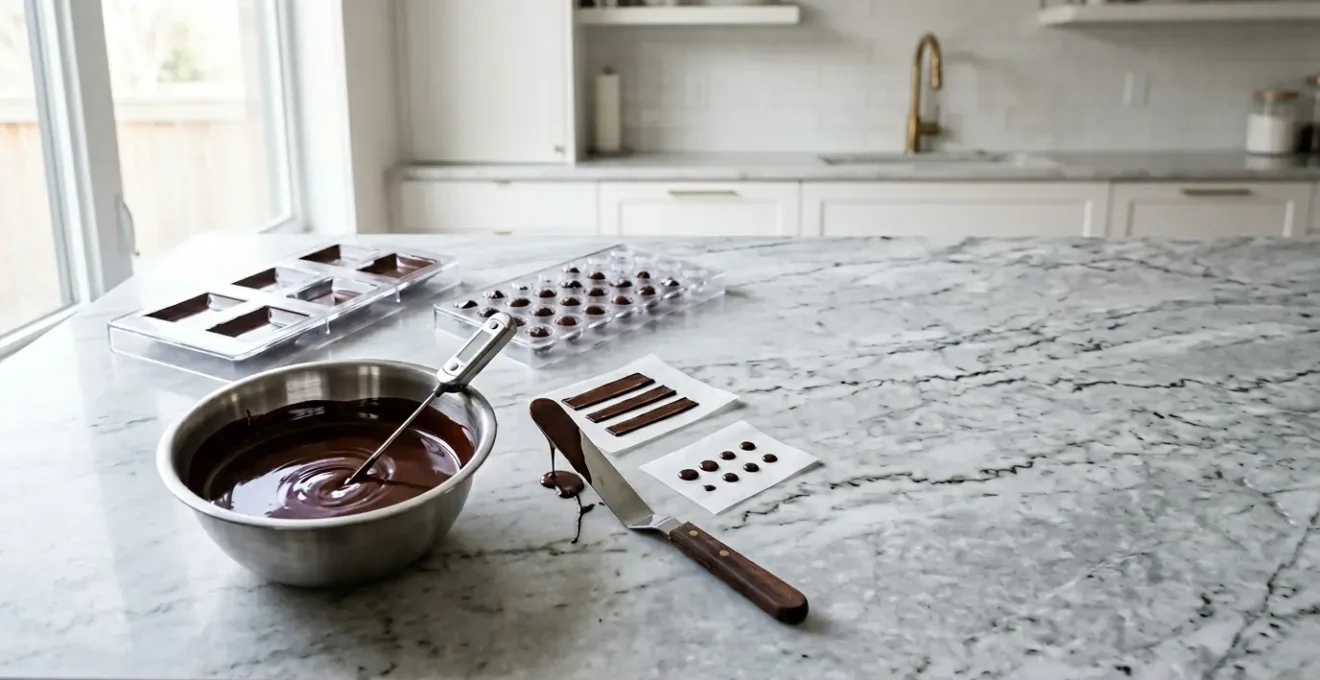
Silicone vs Metal Molds: Which Gives the Best Shine to Pastries?
The final shine of a chocolate is a two-part equation: perfect tempering and a perfect surface. You can have the most flawlessly tempered chocolate, rich in Form V crystals, but if you pour it into the wrong mold, the result will be disappointing. The mold’s surface is what imprints the final texture onto the chocolate as it sets. For home bakers aiming for professional gloss, the choice of mold material is not a matter of preference; it’s a technical requirement.
While flexible silicone molds are convenient for easy de-molding, their porous and slightly textured surface cannot produce a high-gloss finish. The microscopic imperfections in silicone scatter light, resulting in a satin or matte appearance. For a mirror-like shine, the standard is rigid polycarbonate molds. Their perfectly smooth, non-porous surface allows the tempered chocolate to contract as it cools and pull away, leaving an immaculate, glossy finish that is impossible to achieve with other materials.
As the experts at Pastry Chef’s Boutique state in their professional guide:
Polycarbonate molds deliver crisp details, superior shine, and last longer through repeat use. Silicone molds, while flexible, don’t produce the same sharp finish and aren’t ideal for professional-quality results.
– Pastry Chef’s Boutique, Professional Chocolate Molds Comparison Guide
Beyond the material, the mold’s temperature is a critical variable. Pouring warm chocolate into a cold mold will cause “temperature shock,” forcing the cocoa butter to crystallize too quickly and unevenly, ruining the temper. To prevent this, molds should be at room temperature (20-22°C) before filling. This ensures the chocolate cools gradually, allowing the Form V crystals to form an uninterrupted, stable network against the flawless mold surface.
The Substitution Error: Why You Can’t Swap Margarine for Butter in Pastry?
In all forms of pastry, precision with ingredients is paramount. You cannot swap margarine for butter in a delicate croissant because their fat structures and melting points are fundamentally different. This principle of non-substitution is even more critical in chocolate work. The single most common error for beginners is using the wrong type of “chocolate.”
The ability to be tempered is unique to chocolate that contains a high percentage of cocoa butter. This is called couverture chocolate. In contrast, most chocolate chips or baking bars found in regular supermarkets are “compound chocolate.” Compound chocolate substitutes cocoa butter with other vegetable fats, like palm kernel oil. These fats do not have the polymorphic properties of cocoa butter and cannot be tempered. While convenient because they melt easily and set without a complex process, they lack the characteristic snap, sheen, and rich mouthfeel of true chocolate.
As an analysis of the two types explains, professional chocolatiers exclusively use couverture. This is because, according to a detailed article on the difference between couverture and compound chocolate, only the polymorphic crystallization of cocoa butter enables the formation of stable Form V crystals that define high-quality chocolate. Using compound chocolate for a task requiring tempering is like using margarine and expecting the flaky layers of a butter croissant—it is a chemical impossibility.
Identifying true couverture chocolate is a crucial skill for any aspiring home chocolatier. You must become a “label detective” to ensure you are starting with the right raw material.
Action Plan: Identifying True Couverture Chocolate
- Check Cocoa Butter Content: Look for a minimum of 31% cocoa butter content clearly listed in the nutritional information or ingredients. This is the primary indicator.
- Verify the Ingredients List: The list should be simple: cocoa mass (or cocoa liquor), cocoa butter, sugar, and perhaps lecithin and vanilla. The presence of any other vegetable fat (e.g., palm oil, shea) means it is compound chocolate.
- Look for the ‘Couverture’ Designation: Many professional brands will explicitly label their product as “couverture” to indicate it is high-quality and suitable for tempering.
- Avoid Deceptive Marketing Terms: Be wary of products labeled simply as “baking chips,” “melting wafers,” or “confectionery coating.” These are almost always compound chocolate.
- Assess Fluidity Indicators (If Available): Professional brands often use a “drop” system (one to five drops) on the packaging to indicate the chocolate’s viscosity. This is a sign you are looking at a professional-grade product designed for specific applications.
Sequence & Plan: Why You Must Chill Dough for 24 Hours Before Baking
Patience and process are virtues in the pastry kitchen. Chilling cookie dough for 24 hours isn’t an arbitrary step; it allows the flour to fully hydrate and the fats to solidify, leading to better flavor and texture. This same disciplined mindset of preparation, or “mise en place,” is essential for successful chocolate tempering. Rushing the process or using improper tools will guarantee failure. Before you even begin to melt the chocolate, your entire environment must be prepared like a laboratory.
This involves more than just gathering ingredients. It’s about controlling every variable. Your workspace must be cool and dry, ideally between 18-20°C with humidity below 50%. Your polycarbonate molds must be spotlessly clean and polished with cotton to remove any residue that could mar the final shine. Your tools must be chosen for their scientific properties—silicone spatulas, which don’t introduce foreign particles, and a precise digital thermometer are non-negotiable. This disciplined sequence ensures that when you begin the critical tempering process, you are not fighting your environment.
For those seeking an even higher level of control, science provides a near-foolproof method: seeding with pure cocoa butter. As the Callebaut Chocolate Academy explains, a product called Mycryo is a powdered, stable Form V cocoa butter. Adding a very small, precise amount to melted chocolate provides the perfect seed crystals to trigger a chain reaction.
Mycryo is crystallised cocoa butter in powder form. Merely 1% Mycryo is exactly the right amount of beta crystals to start the chain reaction resulting in perfect crystallisation.
– Callebaut Chocolate Academy, Tempering chocolate with cocoa butter tutorial
This isn’t a shortcut, but rather an application of advanced science, introducing a pure “template” for the melted cocoa butter to follow. This level of precision starts with a flawless mise en place.
Stoneware vs Porcelain: Which Is Best for Daily Dinnerware Use?
When considering dinnerware, the choice between stoneware and porcelain often comes down to aesthetics and durability. However, when we reframe this question for the pastry lab, the most important property becomes heat transfer. The material of the bowl you use to melt and temper your chocolate has a dramatic impact on your ability to control its temperature precisely. This is not a minor detail; it is a critical component of your setup.
Different materials retain and conduct heat at vastly different rates. Using a thick ceramic or glass bowl, for example, is a common mistake for beginners. These materials have high heat retention, meaning they cool down very slowly. When you remove a glass bowl of chocolate from a heat source, the bowl itself continues to heat the chocolate, making it incredibly difficult to stop the temperature from overshooting your target. You lose control.
In contrast, a thin stainless steel bowl has low heat retention. It heats up and cools down almost instantly in response to its environment, giving you maximum control. Plastic bowls designed for microwave use have very low retention, making them ideal for the microwave tempering method. Understanding these thermal properties is key to selecting the right tool for the job.
The following comparison illustrates how different bowl materials affect temperature control, a crucial factor for successful tempering.
| Bowl Material | Heat Retention | Temperature Control | Tempering Suitability | Professional Recommendation |
|---|---|---|---|---|
| Glass | High (slow to cool) | Difficult—retains heat 15+ min | Moderate | Usable but requires temperature compensation |
| Stainless Steel | Low (rapid heat transfer) | Excellent—responsive to changes | High | Preferred for double boiler method |
| Plastic (microwave-safe) | Very low | Good for microwave tempering | Moderate-High | Best for small batch microwave method |
| Ceramic | Medium-High | Moderate—slower response | Low-Moderate | Not recommended for precision work |
Choosing stainless steel or a microwave-safe plastic bowl is not about convenience; it’s a strategic choice to gain precise control over the heat transfer dynamics of your system. It’s another example of thinking like a scientist, not just a cook.
The Kelvin Temperature Mistake That Makes New Kitchens Look Sterile
In kitchen design, Kelvin temperature refers to the color of light, and a poor choice can make a space feel sterile and uninviting. In the chocolate lab, a “sterile” approach is one that relies solely on instruments and ignores the crucial sensory data provided by the chocolate itself. While a digital thermometer is essential, a true master learns to read the visual cues that confirm what the numbers are saying. Relying only on a temperature reading is a classic beginner’s mistake.
One of the most advanced tools that bridges the gap between instrument and observation is the infrared thermometer. While a probe thermometer measures the internal temperature at one point, an infrared gun instantly reads the surface temperature from a distance. This allows you to check for hot spots in your melted chocolate, verify the temperature of your work surface, and confirm your molds are at the correct ambient temperature without touching and potentially contaminating anything. It provides a more holistic view of the thermal landscape.
However, the ultimate sign of mastery is the ability to see the results of crystallization directly. As you stir the cooling chocolate, you are encouraging the formation of Form V seed crystals. As these crystals multiply, they change the way light reflects off the surface. Experts look for a subtle change in the chocolate’s appearance—a sign that the temper is developing correctly. As pastry expert Dennis Teets describes this elusive phenomenon:
Look for the purple haze – do you see it? A slight purple haze on the surface of tempered chocolate indicates properly formed Form V crystals.
– Dennis Teets, Chocolate Tempering: Beta Crystal Nucleation and the Purple Haze Phenomenon
This “purple haze” is the visual confirmation of a successful nucleation. It is the chocolate telling you that it is in temper, a signal that no thermometer can provide. Learning to see this requires practice and a trained eye, moving beyond the sterile world of numbers into the realm of true sensory craft.
Key Takeaways
- Tempering is the scientific process of controlling cocoa butter’s polymorphic crystallization to favor stable Form V crystals.
- Success depends on a trinity of factors: the right ingredient (couverture), the right tools (polycarbonate molds, responsive bowls), and the right environment (cool, dry).
- Failure is a data point. Learning to diagnose bloom and other issues is essential for improvement.
Sequence & Plan: Visiting Local Markets at 6 AM for the Best Produce
A master chef knows that a dish is only as good as its raw ingredients. Visiting a market at dawn to select the best produce is not just about freshness; it’s about control and potential. This same principle applies to chocolate. Not all couverture is created equal. The origin, cocoa percentage, and fluidity of your chosen chocolate are all critical variables that will affect the tempering process and the final product.
The terroir of chocolate is real. The climate, soil, and genetics of the cacao beans from a specific region impart unique flavor notes and behavioral characteristics. This is a crucial point for any serious chocolatier, as it directly impacts the final product.
A chocolate from Madagascar will have different flavor notes and fluidity characteristics than one from Ecuador.
– Callebaut Chocolate Academy, Understanding Chocolate Fluidity and Origin
This means a tempering curve that works perfectly for one chocolate might need slight adjustments for another. Furthermore, manufacturers formulate chocolates with different “fluidity” levels, indicated by a drop rating. A high-fluidity chocolate is thin and ideal for coating or intricate molds, while a low-fluidity chocolate is thicker and better for creating stable shells or decorations. Sourcing the right chocolate for your specific application is the final layer of professional control.
Sourcing professional-grade materials goes beyond just the chocolate. It means investing in the tools of the trade from proper suppliers, not craft stores, to build a reliable home laboratory.
- Source couverture chocolate with a minimum 31% cocoa butter content for proper tempering.
- Seek specialty suppliers for polycarbonate molds—prioritize professional pastry equipment retailers.
- Purchase Mycryo (cocoa butter silk) from professional chocolate suppliers for the foolproof seeding method.
- Invest in offset spatulas and bench scrapers from restaurant supply stores for precise manipulation.
- Select single-origin couvertures to understand how terroir affects fluidity and tempering behavior.
- Match chocolate fluidity to application: high fluidity (3+ drops) for detailed molds, lower fluidity for enrobing.
By embracing these principles—understanding fat crystals, diagnosing failures, using the correct tools and ingredients, preparing meticulously, and sourcing professionally—you transform an intimidating art into a controllable science. Mastery is not a secret; it is the consistent application of these fundamental truths. To start putting this knowledge into practice, the next logical step is to refine your own kitchen setup and ingredient selection to meet these professional standards.