The 30-minute mark for foot pain isn’t random fatigue; it’s a specific biomechanical failure point where your body’s muscular compensation collapses.
- This collapse occurs when ill-fitting footwear creates a conflict with your natural foot mechanics, forcing smaller muscles to overwork until they fatigue.
- The “break-in” period is a dangerous myth. Correctly engineered orthopedic shoes should feel comfortable and supportive from the first step, preventing this failure.
Recommendation: To find the right shoe, you must first understand your foot’s behavior under stress. Measure your feet after activity to account for swelling and prioritize footwear with modern, guided-motion stability over simple cushioning.
That familiar, sharp pain that emerges in your heel or arch almost exactly half an hour into a walk is a frustratingly common complaint. For many active individuals, this signals the premature end of an otherwise enjoyable activity. The conventional wisdom often points toward simple solutions: buy a new pair of insoles, stretch more, or simply “walk it off.” Many believe their feet just need to get used to the activity or that new shoes require a painful “break-in” period before they become comfortable. This approach, however, fundamentally misunderstands the specific nature of this time-based pain.
The 30-minute threshold is not an arbitrary number. It is a critical signal from your body. From a podiatric perspective, this pain is the alarm bell indicating a failure in your body’s neuromuscular compensation system. For the first 29 minutes, your muscles are working overtime to counteract a fundamental biomechanical mismatch between your foot’s unique structure and the shoe you’re wearing. When those muscles finally fatigue, the underlying structural conflict is exposed, and pain is the immediate result. This entire sequence is part of a larger system known as the kinetic chain, where a problem in the foot can cascade upwards, affecting everything from your knees to your neck.
But if the solution isn’t just about adding more cushion or enduring a break-in period, what is it? The key is to move beyond treating the symptom and start addressing the root cause. This involves understanding your specific foot mechanics—from arch type to swelling patterns—and selecting footwear that is biomechanically engineered to work *with* your body from the very first step, not against it. It’s about choosing technology that guides your foot, rather than simply blocking its motion.
This guide will deconstruct the science behind the 30-minute pain threshold. We will explore the biomechanical forces at play, provide clinical methods for assessing your own feet, and demystify the technology in modern orthopedic shoes so you can make an informed choice that enables pain-free mobility.
Contents: Understanding and Solving Your Walking Pain
- Why Flat Insoles Cause Knee Pain in People With High Arches?
- How to Measure Your Feet for Swelling Before Buying Walking Shoes?
- Maximum Cushion vs Stability Control: Which Is Best for Overpronation?
- The ‘Break-In’ Mistake: Why Good Orthopedic Shoes Should Feel Right Instantly
- When to Replace Walking Shoes: The Mileage Signs Visible on the Sole
- Asphalt vs Grass vs Treadmill: Which Surface Saves Your Knees?
- Why Your Foot Pain Might Be Causing Your Neck Tension?
- How to Burn More Calories Walking Than Running for Joint Safety?
Why Flat Insoles Cause Knee Pain in People With High Arches?
A common mistake for individuals with high arches (pes cavus) is to assume any cushioned or flat insole will provide relief. In reality, this can exacerbate problems, particularly knee pain. A high, rigid arch is less effective at naturally absorbing shock upon impact. Instead of the foot pronating slightly to dissipate force, the impact energy travels more directly up the leg. This biomechanical trait is not a matter of opinion; as confirmed by research on leg stiffness in high-arched individuals, this foot type demonstrates a significantly increased vertical loading rate.
When you place a flat, unsupportive insole under this rigid structure, you fail to address the core problem. The insole simply allows the foot to maintain its stiff, shock-transmitting posture. The force from each step bypasses the foot’s compromised shock-absorption mechanism and is transferred directly to the next joint in the kinetic chain: the knee. Over thousands of steps, this repeated, unfiltered impact leads to micro-trauma, inflammation, and eventual knee pain. The visual below helps conceptualize this faulty force transfer.
As the illustration symbolizes, the rigid arch acts like an unbending lever, transmitting force directly upward. A proper orthopedic solution for a high arch doesn’t just cushion; it features a contoured arch support that makes contact with the arch itself. This contact encourages a more controlled, gentle pronation, effectively “re-engaging” the foot’s natural shock-absorbing capabilities and shielding the knee from excessive loading forces. Without this specific, contoured support, the knee remains the primary shock absorber, a role it was not designed to fill.
How to Measure Your Feet for Swelling Before Buying Walking Shoes?
Purchasing walking shoes based on your morning foot size is a primary cause of activity-induced pain. Throughout the day, and especially during exercise, feet naturally swell and expand. A shoe that feels perfectly snug at 8 AM can become a compression device by 4 PM or 30 minutes into a walk. To buy the correct size, you must measure your feet when they are at their largest. This requires a systematic approach to capture your “activity-induced” foot profile.
This is not a simple guessing game; it’s a diagnostic process. By measuring before and after the very activity that causes you pain, you collect the precise data needed to select footwear with an appropriate volume and fit. This data-driven approach replaces guesswork with clinical precision, ensuring the shoe you buy accommodates your foot’s dynamic changes. The following protocol provides a step-by-step method for creating your personal foot swelling profile.
Your Action Plan: The Activity-Induced Swelling Test
- Establish a Baseline: First thing in the morning, before significant activity, measure your foot’s length and width. Also, use a soft measuring tape to record the circumference at the instep (the highest part of your arch) and the ball of your foot (the widest part). Log these four numbers.
- Simulate the Pain-Inducing Activity: Put on the socks you typically wear for walking. Perform a brisk, 30-minute walk—the exact duration that usually triggers your discomfort. This is crucial for recreating the conditions of swelling.
- Immediate Re-Measurement: As soon as you finish the walk, while your foot is still swollen and you’re still wearing your sock, re-measure all four dimensions: length, width, instep circumference, and ball circumference. Do this quickly before the swelling subsides.
- Visualize the Expansion: Complement your measurements with the “sock and trace” method. Before your walk, stand on a piece of paper and trace the outline of your foot. After the walk, place the same foot on the same tracing and trace its new, larger outline. This provides a powerful visual of toe splay and overall expansion.
- Create and Use Your Swelling Profile: Compare your “before” and “after” measurements. The “after” numbers represent the minimum internal dimensions your new shoes must have. Use these maximum measurements when consulting sizing charts and selecting shoe materials. If you have significant width expansion, look for shoes with forgiving knit uppers over rigid leather.
Maximum Cushion vs Stability Control: Which Is Best for Overpronation?
Overpronation, the excessive inward roll of the foot during gait, is a common biomechanical issue. The intuitive solution for many is to seek out maximum-cushion shoes, believing that a softer footbed will solve the problem. However, for a true overpronator, a highly cushioned, unstructured shoe can be like walking on a waterbed—it’s soft but offers no control, potentially worsening the instability. The debate is not simply about cushion, but about the *type* of control: traditional stability vs. modern guided motion.
Traditional stability shoes often use a “medial post,” which is a firm, dense piece of foam on the inner side of the shoe designed to physically block the foot from rolling inward. While effective for some, this “blocking” method can feel intrusive and stiff. Modern stability technology takes a more sophisticated approach. Systems like GuideRails or H-Frames use less rigid structures or wider midsole geometries to create a supportive “lane” for the foot. Instead of blocking motion, they gently guide the foot to move along its natural path, only providing correction when it strays. This maintains better ground feel and allows for more natural biomechanics.
The table below, based on insights from a comparative analysis of stability shoe technologies, breaks down the key differences between these two philosophies.
| Feature | Traditional Medial Post Stability | Modern Geometric Stability (GuideRails, H-Frame) |
|---|---|---|
| Mechanism | Rigid dual-density foam or EVA wedge blocks pronation | Wider midsole geometry and soft guide structures gently guide motion |
| Foot Motion Control | Blocked Motion: Prevents inward roll via firmness | Guided Motion: Allows natural movement within safe range |
| Proprioceptive Feedback | Can delay ground feel due to firm materials | Maintains better ground contact sensation |
| Suitable For | Runners needing maximum medial support and direct arch pressure | Walkers/runners whose pronation results from fatigue rather than structural issues |
| Weight & Flexibility | Often heavier and more rigid | Lighter, more flexible (34% more flexible than average in some models) |
| Examples | ASICS GT-4000, Brooks Beast GTS | Brooks Adrenaline GTS (GuideRails), Hoka Arahi (H-Frame), ASICS Kayano (3D Guidance) |
For many walkers experiencing pain from overpronation, a modern guided-motion shoe is the superior choice. It offers the necessary control to prevent fatigue-related form breakdown without forcing the foot into an unnatural position, providing a blend of support and flexibility that works with the body.
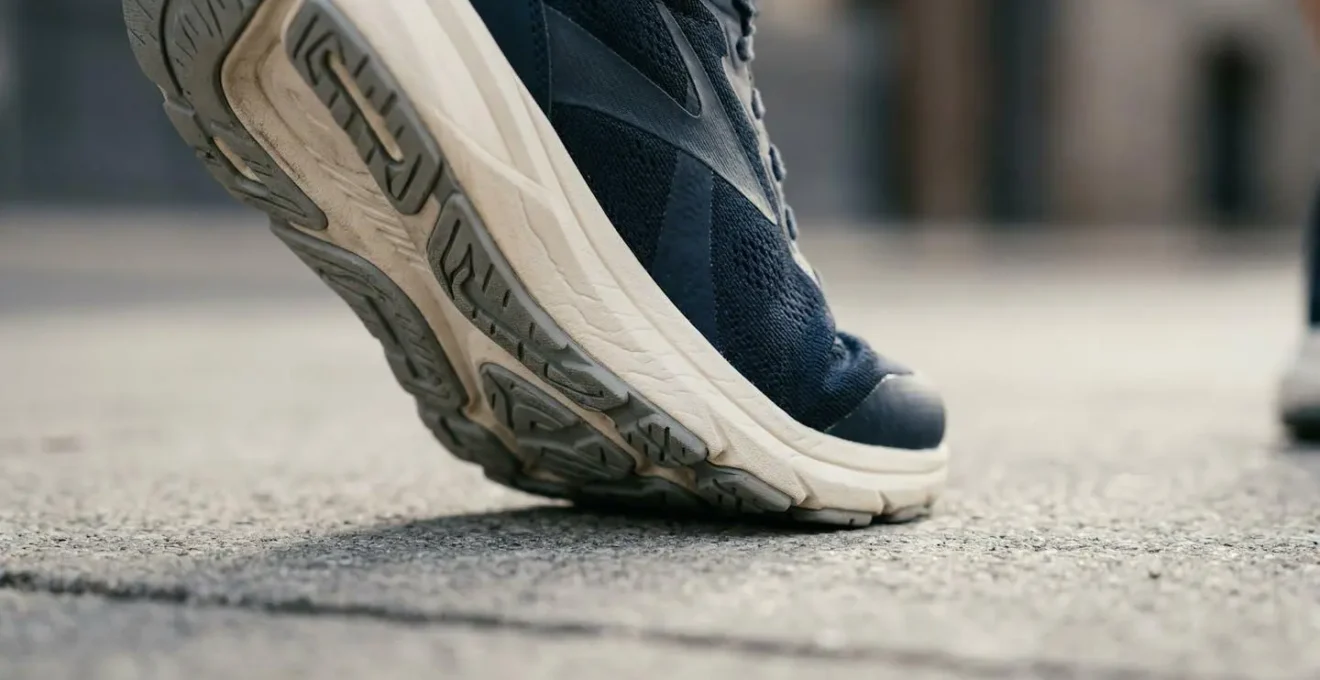
The ‘Break-In’ Mistake: Why Good Orthopedic Shoes Should Feel Right Instantly
One of the most persistent and damaging myths in footwear is the concept of a “break-in” period. Many people tolerate blisters, rubbing, and initial discomfort under the assumption that the shoe needs time to mold to their foot. From a clinical standpoint, this is backward. A properly designed and correctly fitted orthopedic shoe should feel comfortable and supportive from the moment you put it on. The shoe should conform to your foot, not the other way around.
This principle is rooted in modern footwear engineering. As biomechanics experts confirm, the materials and designs used in today’s high-quality athletic and orthopedic shoes are built for immediate performance. As stated by a consensus of biomechanics research, “Modern orthopedic and athletic shoes are engineered with materials designed for optimal performance and comfort out-of-the-box.” The idea of a break-in period is a relic from an era of stiff, unforgiving leather that needed to be manually softened.
Modern orthopedic and athletic shoes are engineered with materials designed for optimal performance and comfort out-of-the-box
– Biomechanics Research Consensus, Contemporary footwear engineering standards
If a shoe causes pain within the first 30 minutes, it is not “breaking in”; it is actively causing a biomechanical mismatch. The pain you feel is the direct result of your body’s failed attempt to compensate for this mismatch, as detailed in the following clinical observation.
Case Study: The 30-Minute Pain Signal
Research on foot pain onset reveals a critical 30-minute threshold. For the first 29 minutes of walking in ill-fitting shoes, the body’s neuromuscular system actively compensates for biomechanical conflicts through increased muscle activation in the feet, ankles, and lower legs. However, once these compensatory muscles fatigue—typically around the 30-minute mark—the underlying biomechanical mismatch becomes exposed, manifesting as pain. This pattern explains why poorly fitted shoes may feel tolerable initially but cause discomfort after a specific duration of activity. A properly fitted orthopedic shoe works with natural foot mechanics from the first step, requiring no muscular compensation and therefore producing no fatigue-related pain onset.
Therefore, consider any initial pain a definitive red flag. It is not a phase to be endured but a clear diagnostic sign that the shoe is fundamentally wrong for your foot’s structure or size.
When to Replace Walking Shoes: The Mileage Signs Visible on the Sole
Even the best orthopedic shoes have a finite lifespan. The critical component that wears out is not the rubber outsole you can see, but the EVA foam midsole hidden within. This foam is responsible for shock absorption and stability. Over time and with repeated compression, it loses its ability to rebound, a phenomenon known as material fatigue. Walking on shoes with a compressed midsole is like driving a car with worn-out shocks—the frame (your skeleton) takes the full force of every bump in the road. General guidelines suggest replacing walking shoes every 500-700 miles, but visual and physical tests are far more reliable indicators than mileage alone.
The most telling signs of midsole failure are visible compression wrinkles. These fine, horizontal lines on the side of the midsole foam indicate that the material has been permanently crushed and can no longer provide adequate support or shock absorption. An old shoe may still have plenty of tread left on the bottom, but if the midsole is fatigued, its protective capabilities are gone.
Beyond visual inspection, you can perform several physical tests to assess a shoe’s structural integrity. These simple diagnostics can reveal a loss of support long before it leads to a new injury.
- Midsole Compression Test: Press your thumb firmly into the midsole foam. On a new shoe, the foam will feel springy and rebound instantly. If your thumb leaves a significant indentation that is slow to recover, the foam is compacted and has lost its shock-absorbing properties.
- Torsion Test: Hold the shoe by the heel and toe and twist it as if you were wringing out a towel. A structurally sound shoe should offer strong resistance to twisting. If the shoe twists easily like a dish rag, its torsional support is gone, increasing the risk of arch strain and plantar fasciitis.
- Flex Test: Bend the shoe. It should flex naturally where your foot flexes—at the ball of the foot. If the shoe bends in the middle of the arch instead, its shank is broken, and it can no longer support your midfoot properly.
Regularly performing these checks is a crucial preventative measure. Continuing to use a structurally failed shoe is a direct path to re-injury, as it no longer provides the biomechanical support your feet and joints require.
Asphalt vs Grass vs Treadmill: Which Surface Saves Your Knees?
The common advice given to people with joint pain is to avoid hard surfaces like asphalt and concrete in favor of softer ones like grass or dirt trails. The logic seems simple: a softer surface means less impact. However, from a biomechanical perspective, the reality is far more complex. Your body is not a passive object; it is an intelligent, adaptive system that actively adjusts to the surface underneath it. This means that a soft surface is not inherently “safer” and can, in some cases, increase strain.
The key mechanism at play is “leg stiffness adaptation.” Your neuromuscular system constantly tunes the stiffness of your leg muscles and tendons to maintain stability and absorb shock appropriately for the given surface. A hard surface provides predictable, high-impact forces, while a soft surface provides unpredictable, low-impact forces but demands more stabilizing work.
Case Study: Leg Stiffness Adaptation
Biomechanical research reveals that the human body is not a passive shock absorber but actively adjusts leg stiffness based on surface properties. On hard surfaces like asphalt, the neuromuscular system automatically reduces leg stiffness, making muscles and tendons more compliant to absorb impact forces. Conversely, on soft, unstable surfaces like sand or thick grass, the body increases leg stiffness to maintain stability and prevent excessive joint motion. This adaptive mechanism means that soft surfaces are not inherently ‘better’ for joints—they simply present different challenges. Individuals with weak intrinsic foot muscles or poor ankle stability may actually experience greater tendon strain on soft surfaces as their bodies struggle to maintain the necessary stiffness for stability.
For a walker with strong, stable ankles, a treadmill or a smooth asphalt path can be excellent choices because they are predictable, allowing the body to find an efficient rhythm. For someone with good mechanics, walking on grass or a trail can help build stabilizing muscles. However, for an individual with existing instability or overpronation, an uneven, soft surface can force the small stabilizing muscles in the feet and ankles to work overtime, leading to fatigue and potential injury to the Achilles tendon or peroneal tendons. The “best” surface is therefore highly individual and depends on your specific biomechanical strengths and weaknesses.
Why Your Foot Pain Might Be Causing Your Neck Tension?
It can be difficult to connect a nagging pain in your heel with the persistent tension in your neck, but from a podiatric and biomechanical standpoint, the link is direct and predictable. The body functions as an integrated kinetic chain, a series of interconnected segments where movement or misalignment in one part affects all others. The feet are the foundation of this chain. When that foundation is unstable, compensatory adjustments ripple all the way up to the skull.
If you suffer from a condition like plantar fasciitis or overpronation, your natural gait is altered. You might unconsciously shift your weight to the outside of your foot, shorten your stride on the painful side, or lock your knee to avoid impact. These are not localized adjustments; they trigger a cascade of compensations. To compensate for the altered foot position, your knee rotates slightly. To correct for the rotated knee, your hip tilts. To keep your eyes level with the horizon despite a tilted hip, your spine curves, and your shoulder on one side may drop. Finally, the muscles in your neck and suboccipital region must contract asymmetrically to hold your head level.
Over thousands of steps each day, this sustained, abnormal muscle contraction leads to ischemia (reduced blood flow), trigger points, and chronic tension or pain in the shoulders and neck. The problem isn’t in your neck; the *symptom* is in your neck. The root cause is the unstable foundation at your feet. This connection is not anecdotal; it is a well-documented clinical pattern. In fact, according to the 2024 Foot Pain Trends Report, 33% of sufferers also report related health problems in their back, knees, and hips, illustrating the widespread effect of the kinetic chain.
Key Takeaways
- Foot pain appearing at the 30-minute mark is a clinical sign of neuromuscular fatigue, not just general tiredness.
- A good orthopedic shoe must feel comfortable immediately. The “break-in” period is a myth that points to a poor biomechanical fit.
- Choose footwear based on function, such as modern “guided motion” for overpronation, rather than just relying on cushioning.
- The body is a kinetic chain; untreated foot problems will inevitably lead to compensatory pain in the knees, hips, back, and even the neck.
How to Burn More Calories Walking Than Running for Joint Safety?
For individuals managing joint pain, high-impact activities like running are often untenable. Walking is the ideal alternative, but many assume it’s a less effective workout for calorie expenditure. This is a misconception. By strategically modifying your walking technique and environment, you can significantly increase metabolic cost, engaging more muscle groups and burning more calories than a slow jog—all while keeping impact forces low and protecting your joints.
The key is to transform walking from a passive leg-based activity into an active, full-body workout. This involves adding resistance, engaging the upper body, and challenging your stabilizing muscles. These evidence-based methods increase energy expenditure by forcing your body to work harder to maintain momentum and stability, all without the pounding stress of running.
- Rucking (Weighted Backpack Walking): Adding 10-20% of your body weight in a well-fitted backpack positioned high on your back is a highly effective method. This load engages the large postural muscles of your core, back, and glutes to maintain an upright posture. This can increase caloric burn by 40-50% compared to unweighted walking, as the load is distributed through your axial skeleton rather than adding impact stress to your limb joints.
- Variable Terrain Walking: Deliberately choose routes with gentle inclines, well-maintained trails, or even cobblestones. Walking on uneven surfaces forces hundreds of micro-adjustments per minute from the intrinsic muscles in your feet and your ankle stabilizers. This constant neuromuscular activity can increase metabolic cost by 20-30% compared to a flat sidewalk, while also building functional joint strength and proprioception.
- Nordic Walking (Pole-Assisted): Using specialized walking poles with the correct technique—planting the poles behind you and actively using your latissimus dorsi (back) muscles to propel yourself forward—turns walking into a true full-body workout. This engages an estimated 90% of your body’s musculature, compared to 50% in normal walking. The poles also help to offload the lower body, reducing peak knee and hip impact forces while increasing energy expenditure by up to 46%.
By incorporating these techniques, walking becomes a powerful tool for both cardiovascular health and weight management, offering a high-reward, low-risk alternative for anyone who needs to prioritize joint safety.
By understanding the precise biomechanical reasons for your pain, you can stop the cycle of trial-and-error and begin making clinically-informed decisions. The next logical step is to apply this knowledge by choosing footwear that is engineered not just to cushion, but to correct and support your unique kinetic chain. Assess your needs, use the methods in this guide, and invest in your mobility.