In summary:
- Unpleasant smells are a sign of imbalance, usually too much nitrogen (‘greens’) or not enough air. It’s a solvable problem, not a failure.
- Vermicomposting (worm bins) is a highly efficient, odor-free method if you bury food scraps correctly.
- Choosing the right system—Bokashi, worms, or electric—depends on your lifestyle and the type of food waste you produce.
- A strict “biosecurity protocol,” like freezing scraps and maintaining a bedding barrier, is your best defense against pests.
The dream of turning kitchen scraps into black gold is a noble one for any eco-conscious urban dweller. But the dream often crashes into a wall of fear: the nightmare of a smelly, pest-infested apartment. You’ve likely heard the horror stories or seen confusing guides that talk about complex ratios and rules, making the whole process seem daunting and risky for a small living space. The fear of attracting fruit flies or creating a foul odor is the number one barrier that stops people from starting.
Most advice boils down to generic tips like “balance your greens and browns” or “don’t add meat.” While true, this advice fails to address the core anxiety because it doesn’t explain the *why*. It treats composting as a set of rigid rules to follow, rather than a dynamic process to manage. But what if the secret wasn’t about avoiding failure, but about understanding success? What if you could learn to read the signs of your compost bin and respond with confidence?
This is where we shift our perspective. The key to successful apartment composting is to stop being a “rule follower” and become a “Microbe Manager.” Your compost bin is not a trash can; it’s a tiny, managed ecosystem. Your role is to provide the right conditions for the good microbes to thrive, which naturally prevents the smells and pests associated with the bad ones. This guide will empower you to diagnose your bin, troubleshoot common issues before they start, and confidently transform your food waste into a valuable resource—all without compromising the peace and cleanliness of your home.
This article provides a complete roadmap to becoming a confident apartment composter. Explore the sections below to understand the science, choose the right system, and master the practical skills for an odor-free, pest-free experience.
Summary: A Complete Guide to Odorless Apartment Composting
- Why Your Compost Pile Is Slimy and Smells Like Ammonia?
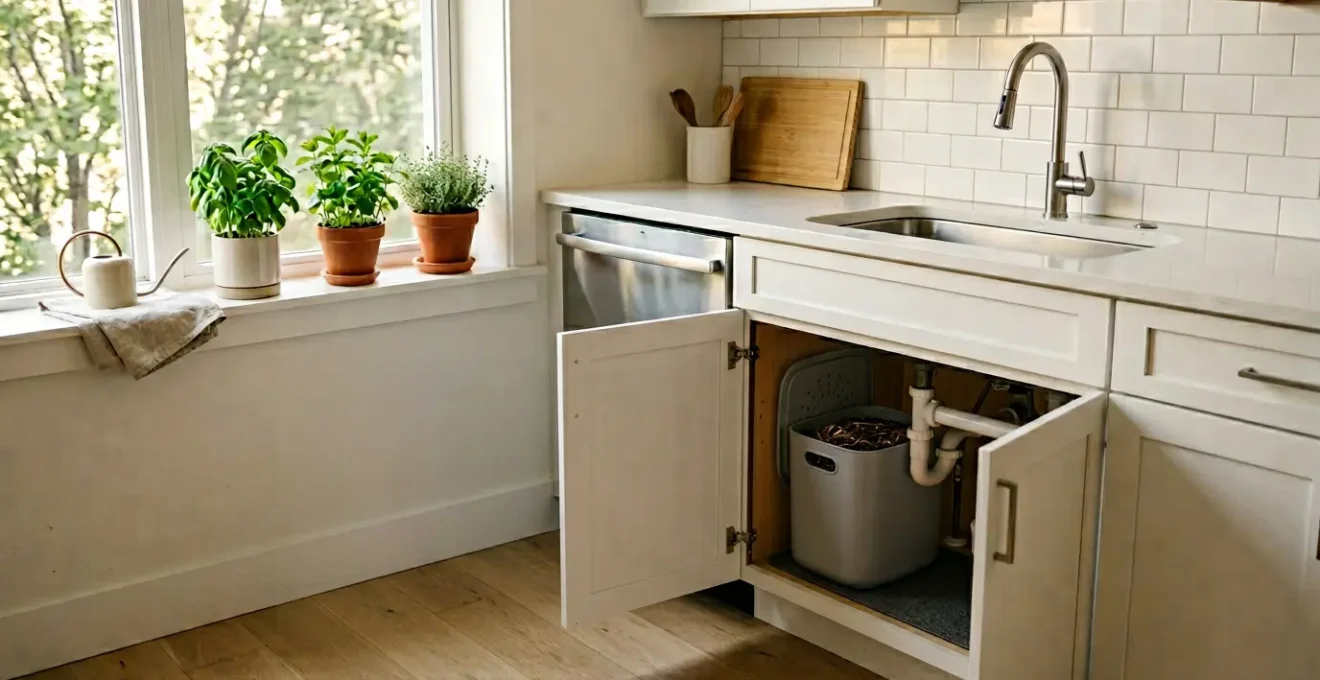
- How to Keep Worms Alive and Happy Under Your Kitchen Sink?
- Tumbler vs Pile vs Bokashi: Which Method Fits Your Lifestyle?
- The Meat and Dairy Mistake: What Never to Put in an Open Pile?
- Problem & Solution: Speeding Up the Rot During Cold Winter Months
- Downcycling vs Upcycling: Why Keeping Materials at High Value Matters?
- Why Cleaning Your Boots Can Save an Entire Valley From Invasive Species?
- Meat-Free Days vs Cold Showers: Which Lifestyle Change Saves More CO2?
Why Your Compost Pile Is Slimy and Smells Like Ammonia?
That sharp, unpleasant ammonia smell is the first sign of an ecosystem imbalance in your bin. It’s not a sign of failure; it’s a specific chemical signal that your microbes are sending you. This smell occurs when there is an excess of nitrogen-rich “green” materials (like vegetable scraps and coffee grounds) compared to carbon-rich “brown” materials (like shredded cardboard, paper, or dry leaves). The microbes can’t process the nitrogen fast enough, so it off-gasses as ammonia. A slimy texture is a related symptom, indicating that the pile is too wet and has gone anaerobic (lacking oxygen), causing putrefaction instead of healthy decomposition.
The solution lies in a bit of compost forensics. You must restore the balance. The ideal ratio for efficient, odor-free composting is the key. In fact, Cornell University’s composting research shows that a ratio of roughly 30 parts carbon to 1 part nitrogen by weight provides the perfect diet for decomposing microbes. For an apartment bin, this means for every handful of kitchen scraps you add, you should be adding two or three handfuls of shredded paper or cardboard. This carbon absorbs excess moisture and provides the energy microbes need to break down the nitrogen without producing odors.
To fix an existing problem, immediately stop adding “greens” and mix in a generous amount of dry “browns.” Turn the material if possible to introduce oxygen, which suffocates the smelly anaerobic bacteria and helps the beneficial aerobic ones get back to work. A healthy compost pile should have the texture of a wrung-out sponge and smell earthy and pleasant, not foul.
This image showcases the ideal structure: distinct layers of materials that allow for airflow and a balanced diet for your microbial workforce. Notice the textural variety, which is a hallmark of a healthy, aerobic system. Your goal is to create this diverse, well-aerated environment inside your bin.
How to Keep Worms Alive and Happy Under Your Kitchen Sink?
Vermicomposting, or composting with worms, is one of the most efficient and odor-free methods for an apartment. The key is creating a stable environment where your worms—typically Red Wigglers (Eisenia fetida)—can thrive. These creatures are voracious eaters; University of Maryland Extension research shows that Red Wigglers can consume their own weight in food scraps daily and are most active in a specific temperature range. Your job as the Microbe (and worm) Manager is to provide this perfect habitat.
Setting up your worm bin correctly from day one is crucial for long-term, pest-free success. Follow these essential steps for creating a happy worm home:
- Prepare the Bedding: Shred newspaper or cardboard into thin strips. Dampen it until it feels like a wrung-out sponge—moist but not dripping. Fluff it up and fill your bin about three-quarters full. This provides a safe, breathable home for the worms.
- Introduce Microbes: Sprinkle a few cups of finished compost or outdoor soil into the bedding. This inoculates the bin with beneficial microorganisms and provides essential grit that aids the worms’ digestion.
- Add Your Worms: Gently place about one pound of Red Wigglers on top of the bedding. They will quickly burrow down to escape the light.
- Bury Food Scraps: This is the most critical step for preventing odors and pests. Always pull back a section of bedding, add your food scraps, and then cover them completely with at least two inches of bedding. Never leave food exposed on the surface.
- Maintain a Barrier: Place a full, dry sheet of newspaper on top of the bedding. This helps maintain moisture balance and acts as a final physical barrier against any potential fruit flies.
- Position the Bin: Keep the bin in a dark, stable-temperature location, like under the kitchen sink. The ideal range is 55°F to 77°F (13°C to 25°C), away from heaters or direct sunlight.
A well-maintained worm bin is virtually odorless. If you notice any issues, it’s almost always because food was left exposed or the bin became too wet. By consistently burying food scraps and managing moisture with bedding, you create an environment where worms flourish and pests have no interest.
Tumbler vs Pile vs Bokashi: Which Method Fits Your Lifestyle?
There is no single “best” composting method for an apartment; there is only the best method for *you*. Your choice should be a deliberate decision based on your available space, the amount and type of waste you produce, and how much time you want to invest. Are you a patient gardener seeking premium fertilizer, or a busy professional focused on zero-waste with minimal effort? Understanding the trade-offs is the first step to choosing your system.
The following table breaks down the most common apartment-friendly composting systems. Analyze it not just for features, but for how each one aligns with your personal goals and living situation. This is the core of your “Microbe Manager” toolkit selection.
| Method | Space Needed | Speed | Accepts Meat/Dairy | Final Product | Best For |
|---|---|---|---|---|---|
| Vermicomposting (Worm Bin) | Under-sink / Countertop | 6-8 weeks | No | Ready-to-use worm castings (‘black gold’) | The Patient Gardener—wants premium compost, has time for weekly feeding |
| Bokashi | Under-sink / Countertop | 2-4 weeks (fermentation) | Yes | Fermented pre-compost (must be buried or added to outdoor pile) | The Food Waste Warrior—processes all scraps including meat/dairy, has outdoor burial space |
| Electric Composter | Countertop | 24 hours | Yes | Dehydrated sterile biomass (not living compost) | The Busy Professional—wants fast volume reduction, minimal maintenance, odor-free |
| Small Tumbler | Balcony / Patio | 3-6 months | No | Finished compost | Apartment dweller with outdoor space who wants traditional composting |
As you can see, the methods offer vastly different outcomes. Vermicomposting and a small tumbler produce true, living compost but cannot handle meat or dairy. Bokashi is a fermentation process that handles *all* food waste, but the end product is a “pre-compost” that must be buried outside or added to another compost system. Electric composters are the fastest and most convenient, reducing food scraps to a dry, sterile powder in hours, but this material is not living compost and lacks the beneficial microbes of traditional methods.
Your lifestyle dictates the right choice. If you want to process all food scraps including last night’s leftovers, Bokashi or an electric unit are your only options. If your goal is to create the richest possible soil amendment for your houseplants and you only produce vegetable scraps, a worm bin is unparalleled.
The Meat and Dairy Mistake: What Never to Put in an Open Pile?
The cardinal rule of small-scale composting is “no meat, dairy, or oily foods.” This isn’t an arbitrary rule; it’s a practical safety measure based on temperature. Meat and dairy are magnets for pests and can harbor harmful pathogens like E. coli and Salmonella. To safely destroy these pathogens, a compost pile must reach and maintain high temperatures, a condition that is nearly impossible to achieve in a small apartment bin or backyard pile.
The science is clear on the required heat. To ensure pathogen destruction, Michigan State University Extension guidelines specify that a compost pile must reach temperatures of 130°F-160°F (55°C-71°C) and maintain them for at least five consecutive days, a process that should be repeated through turning the pile. Most home compost bins, especially those kept indoors or on a balcony, will never consistently reach this thermophilic state. Adding meat or dairy to a “cool” pile is an open invitation for foul odors, rodents, and dangerous bacteria to multiply.
This is where the distinction between home and industrial composting becomes critical. Large-scale commercial facilities are designed to handle these materials safely.
Case Study: Industrial vs. Home-Scale Meat Composting
A study by the Oregon Department of Environmental Quality highlighted this difference. At industrial facilities, mixed food waste piles including meat quickly reached temperatures above 131°F (55°C), with some hitting 165°F (74°C). The protein-rich materials actually fueled the heat, and within two weeks, all visible traces of meat were gone. The study concluded that these conditions are essential for safety but are simply not achievable at a small, home-based scale. For the apartment composter, this means the “no meat” rule is a non-negotiable part of your ecosystem management.
So, unless you are using a specialized system like Bokashi (which ferments rather than decomposes) or a high-end electric composter, you must be strict. Stick to fruit and vegetable scraps, coffee grounds, tea bags, eggshells, and plant trimmings. This discipline is your primary defense against the most common composting failures.
Problem & Solution: Speeding Up the Rot During Cold Winter Months
As winter approaches, a common fear is that the composting process will grind to a halt. Lower ambient temperatures do slow down microbial activity, but a well-managed compost bin can continue working all winter long. The secret is understanding that a healthy compost pile is a living furnace—the decomposition process itself generates heat. Your job as the Microbe Manager is to insulate that furnace and keep feeding it the right fuel.
As the experts at Michigan State University Extension note in their guide,
Although the process may be a little slower, your compost pile is actually warm/hot all winter long if it is managed properly.
– Michigan State University Extension, Food Safety and Composting Guide
To achieve this, focus on two key areas: insulation and fuel. If your bin is on a balcony, move it against a wall of your apartment to capture radiant heat. Wrap the bin in an old blanket or burlap sacks to provide an extra layer of insulation. You can even build a simple enclosure with straw bales if you have the space. This traps the heat generated by the microbes, keeping the core of your bin active even when the air is freezing.
Next, adjust your feeding strategy. In winter, your microbes need more “hot” fuel to keep the fire burning. This means being diligent about maintaining your carbon-to-nitrogen ratio. Save up dry leaves from the fall to use as your primary “brown” material. When you add food scraps (“greens”), chop them into smaller pieces to increase the surface area for microbes to work on. Adding a dose of nitrogen-rich materials like used coffee grounds can also give the pile a temporary heat boost. Finally, ensure the pile stays moist but not frozen; the moisture is essential for microbial life. A well-insulated, well-fed bin will continue to slowly break down materials all winter, ready for a burst of activity in the spring.
Downcycling vs Upcycling: Why Keeping Materials at High Value Matters?
When you throw food scraps in the trash, they are effectively downcycled. They end up in a landfill, take up space, and release harmful methane gas. Even standard recycling can be a form of downcycling, where a material is turned into something of lower quality. Composting, especially high-quality apartment composting, is the opposite: it’s a powerful act of nutrient upcycling. You are not just getting rid of waste; you are transforming low-value scraps into a high-value product that is richer and more beneficial than the sum of its parts.
The ultimate expression of this principle is found in vermicomposting. While all compost is good, the “black gold” produced by a worm bin is in a class of its own. The worms don’t just decompose the material; they actively enhance it. As food scraps pass through a worm’s digestive tract, they are enriched with enzymes and beneficial microorganisms. The final product, known as worm castings, is a super-concentrated, nutrient-dense soil amendment.
The difference is not trivial. Extensive research on vermicomposting demonstrates that worm castings contain higher plant-available nitrogen, phosphorus, and potassium than standard compost. Furthermore, they are teeming with a much higher concentration of beneficial microbes that help plants fight off diseases and absorb nutrients more efficiently. When you use worm castings on your houseplants, you are adding a living, probiotic boost to the soil that you simply cannot get from synthetic fertilizers.
This concept of upcycling is a powerful motivator. You’re not just avoiding the environmental negative of landfilling your waste. You are actively creating a positive: a premium, all-natural fertilizer that will make your indoor garden thrive. Every banana peel and coffee ground you add to the bin is an investment in the health of your plants. This is the true reward for your work as a meticulous Microbe Manager.
Why Cleaning Your Boots Can Save an Entire Valley From Invasive Species?
The title is a metaphor used by conservationists, but it holds a profound lesson for the apartment composter. The principle is about biosecurity: preventing the introduction of unwanted organisms into a contained ecosystem. For a hiker, it’s about not tracking invasive seeds from one trail to another. For you, it’s about establishing a Biosecurity Protocol for your compost bin to prevent pests like fruit flies and fungus gnats from ever establishing a foothold in your kitchen.
Pests are not an inevitable part of composting; they are a sign that the biosecurity of your bin has been breached. The most common entry point is the food scraps themselves, which often carry fruit fly eggs from the grocery store. The second is leaving food exposed on the surface of your bin, which sends an open invitation to any pests in the vicinity. A proactive, preventative mindset is your best defense.
You must treat your bin like a clean room. By implementing a few simple, non-negotiable rules, you can create a system that is virtually impervious to pests. This isn’t just about being clean; it’s about active management and control over what enters and leaves your compost ecosystem. An ounce of prevention here is worth a pound of cure, and a pest-free bin is the ultimate mark of a skilled Microbe Manager.
Your 5-Step Biosecurity Audit: Pest-Proofing Your Bin
- Points of Contact: List all potential entry points for pests—imperfectly sealed lids, ventilation holes, even nearby open windows. Are they secure?
- Collection: Inventory your current process for adding scraps. Do you freeze them first? Do you bury them immediately and completely? Be honest about your consistency.
- Coherence: Compare your current practices against the core biosecurity principle: “No Exposed Food.” Identify any gaps between the rule and your routine.
- Vulnerability Assessment: Pinpoint the single weakest link in your process that causes the most worry, such as forgetting to bury scraps when you’re in a hurry.
- Integration Plan: Create a new, non-negotiable rule to fix that weak link. For example: “All fruit scraps will be stored in a sealed container in the freezer before being added to the bin once a week.”
Key Takeaways
- Smell is data, not disaster. An ammonia smell means you need more carbon (‘browns’); a rotten smell means you need more air.
- The “no meat or dairy” rule is about temperature. Home bins don’t get hot enough to kill pathogens, so stick to plant-based scraps unless using Bokashi.
- A proactive “Biosecurity Protocol” (freezing scraps, always burying food) is the secret to a completely pest-free apartment composting experience.
Meat-Free Days vs Cold Showers: Which Lifestyle Change Saves More CO2?
While comparing the carbon footprint of different lifestyle choices is complex, the environmental impact of composting your food scraps is surprisingly significant, and it all comes down to one powerful greenhouse gas: methane. When organic waste like food scraps is sent to a landfill, it gets buried under tons of other trash. Deprived of oxygen, it decomposes anaerobically and produces large quantities of methane.
This is a critical issue because, as Oregon State University Extension research confirms, methane is about 20 times more potent than carbon dioxide as a greenhouse gas over a 100-year period. Some calculations, focusing on its short-term impact, find it even more powerful. This means that every pound of food waste you divert from the landfill has an outsized positive impact on the climate. Considering that research indicates that food waste makes up a staggering 20% by weight of all landfill materials in the United States, the collective potential for change is enormous.
By composting in your apartment, you are performing a crucial environmental service. You are intercepting that waste stream and ensuring it decomposes aerobically (with oxygen), a process that produces a negligible amount of methane and primarily releases carbon dioxide that was already part of the natural carbon cycle. You are single-handedly preventing the creation of a super-potent greenhouse gas.
So, while the math on meat-free days versus cold showers can be debated, the impact of keeping food out of landfills is clear and direct. Your small, odorless bin under the sink is a personal methane-reduction factory. It’s a tangible, daily action that connects your kitchen directly to the global fight against climate change, proving that even in a small apartment, you can make a big difference.
Start your journey today by choosing the right system for your lifestyle and begin collecting your “browns.” Your kitchen’s ecosystem is ready for its new manager, and the planet will thank you for it.